I normally post "How-to articles..." however, I figured this time I'd share a thought that came into my head yesterday as I was watching "Grey's Anatomy". Now I am not particularly a big fan of that show but my wife had a surgery recently and while she was on bed rest, I started to watch the show with her. In one of the episodes, it was revealed that Meredith's mother wrote down all of her research because she was going to get Alzheimer and would eventually forget everything. As I was watching this episode, suddenly a thought popped into my head ... "why do you write how-tos/blogs? ... it's time consuming ... you could be doing something else instead...?" ... As I laid awake mulling over on this thought ... I realized that there are more than one reason as to why I write ...
Showing posts with label Tips and Tricks. Show all posts
Showing posts with label Tips and Tricks. Show all posts
Wednesday, December 23, 2015

Tuesday, February 10, 2015
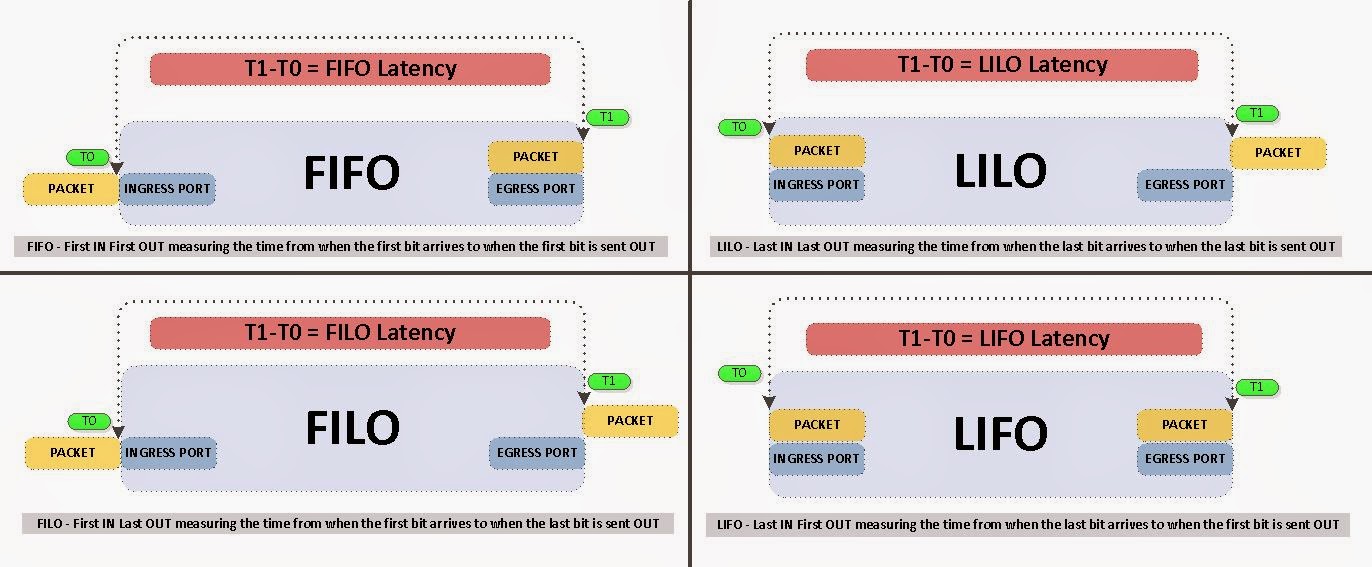
40G MORE is NOT always BETTER - Why 40G can potentially delay your packets?
40G might actually delay your packets and here is the reason why.
Before we get too much into the semantics behind this, let define some key terms in latency measurements. I am also going to leave out the minor benefits gained from "inter-frame gap" of 40G packets. If you are interested in further information regarding latency testing/benchmarking standards please see RFC 2544.
Sunday, November 24, 2013
Cisco Nexus 3548 - Configuring Active Latency Monitoring Hidden Cisco commands
In my previous blogtorial 'Cisco Nexus 3548 - Configuring Active Buffer Monitoring' I demonstrated how we can monitor buffer spaces, however what if I wanted to know the latency profile of the entire switch or per port. Enter the world of Cisco hidden commands and that's where you will find 'Active Latency Monitoring' quietly lurking around. These set of commands will enable switch latency profile measurements and give you the per port latency statistics such as total frame count within a time period, the min/max/avg latency for those frames.
For some reason, Cisco decided to keep it hidden although it may be added to the next release. As of now use this command with caution, since it is hidden it is not supported in the configuration (yet).
Here is how you configure 'Active Latency Monitoring' on a Cisco Nexus 3548.
Friday, November 15, 2013
Cisco Nexus 3548 - Configuring Active Buffer Monitoring
It never ceases to amaze me that people value time as money. To me time is more than money. I can make money and I can make more if I worked at it, but time -- that's a different story. I cannot make time, I cannot buy more time, I cannot take it from someone else -- Once it's gone it's gone forever. As I sit here on the train (my daily hour commute) the time it's taking me to write this blogtorial is gone. I can never get it back so hopefully I am doing something worthwhile, something that will help someone, and something that I enjoy. With all that aside let's go into how to configure 'Active Buffer Monitoring' on a Cisco Nexus 3548.
When you are down to nanoseconds on port to port latency, monitoring your buffer space becomes more crucial than ever. Because whenever you buffer your switch is now store and forward for those buffered bytes instead of cut through. If you're switch is store and forward then you are not getting the ~ 230 nanoseconds port-to-port latency that you just spent $20K for.
Before we can dive into configuring buffer monitoring it would be beneficial to understand buffer blocks and how the ports are mapped. First there are 3 buffer blocks each containing 6MB worth of buffer space which gives us a total of 18MB shared buffer. Ports to these buffer blocks (3 x 6MB) are mapped as follows.
When you are down to nanoseconds on port to port latency, monitoring your buffer space becomes more crucial than ever. Because whenever you buffer your switch is now store and forward for those buffered bytes instead of cut through. If you're switch is store and forward then you are not getting the ~ 230 nanoseconds port-to-port latency that you just spent $20K for.
Before we can dive into configuring buffer monitoring it would be beneficial to understand buffer blocks and how the ports are mapped. First there are 3 buffer blocks each containing 6MB worth of buffer space which gives us a total of 18MB shared buffer. Ports to these buffer blocks (3 x 6MB) are mapped as follows.
Saturday, August 24, 2013
Dot1Q Tunnel / q-in-q Tunneling
Dot1Q tunnel or q-in-q tunneling is a technique generally used by service providers to extend customer's VLANs to different locations. It is done by encapsulating the customer VLAN inside another 802.1q encapsulation and because of this we must increase the system mtu on the service provider switches to something greater than 1500. In this blogtorial, we will take a look at a very simple topology with easy to follow configurations.

Here is the topology.

Our objective:
VLAN 10 in a Customer Site in California (SW1) needs to be extended to a Customer Site in Illinois (SW4).
Friday, August 23, 2013
BGP - Unicast NLRI to Multicast NLRI - translate-update cisco
I have been extremely busy with work, school and CCIE studies so I have not been able to post as much as I want to. There are numerous drafts ready to be posted so hopefully I'll have sometime to share it on here. Alright, enough with the excuses and let's get started. In this blogtorial we will see how we can take a unicast route received from a unicast BGP neighbor and install it in the multicast routing table and advertise it to MBGP peers using translate-update feature. Usually this is done for in-congruent BGP topology where a MBGP capable router peers with router that is incapable of MBGP.
Here is the topology.
Here is the topology.

Tuesday, March 5, 2013
ip multicast helper-map - Converting Broadcast and Multicast
If you work in the financial industry you are bound to encounter a situation where you will have an application that publishes udp data as broadcast and you will need to convert it to multicast -- maybe even back to broadcast if needed. This is very similar to the "ip helper address" because "ip helper-address" converts DHCP (udp) to unicast packets and sends it to the DHCP server.

Couple of very important roles of the routers in this setup are FHR and LHR. First-hop router that is connected directly to the source which is broadcasting the data and the Last-hop router that is connected to the destination subnet which can convert the multicast back to broadcast.
Consider this simple topology and let's get started.

Complete configs can be found here.
Friday, March 1, 2013
Converting Multicast to Unicast
In my previous blogtorial "Converting unicast to multicast" we discussed how to convert unicast to multicast and what the benefits are. Suppose that for one reason or another we had to convert from multicast to unicast -- how would we go about doing that? Well in this blogtorial we'll do just that.
Let's get started.

In this scenario, R2 will convert multicast coming in on Fast1/0 and convert it to unicast on Fast1/1.
Complete configs can be found here.
Let's get started.

In this scenario, R2 will convert multicast coming in on Fast1/0 and convert it to unicast on Fast1/1.
Complete configs can be found here.
Monday, February 25, 2013
Converting Unicast to Multicast
Imagine that you had to do a presentation in front of
an audience. Would it make sense to stand on a stage and give the presentation
or sit with each individual and repeat the presentation multiple times? Well
obviously standing on the stage and giving the presentation once to many
audiences is much more efficient – this concept in networking is referred to as
one-to-many multicast. One stream distributed to multiple receivers is just one
of the advantages of running multicast on your network. If there are many
receivers listening for one stream, there is no need for the server to send the
same stream to multiple destinations – just use multicast.

But what if the
server is running an outdated software and can not do multicast? No worries, today
we are going to see how we can convert unicast into multicast. This blogtorial
assumes that the reader is somewhat familiar with multicast concepts and
configurations such RP, IGMP and PIM.
Here is our objective:
- Software BuiBui residing on Comp1 is sending unicast data.
- Instead of Comp1 wasting bandwidth and sending the same data to Comp4 (C4) and Comp5 (C5), we need to convert the unicast to multicast data and forward it to Comp4 (C4) and Comp5 (C5).

Complete configs can be found here.
Thursday, February 21, 2013
Show run/copy run start on Cisco takes forever?
Are you frustrated that "Show run", "Show run interface <something>, "write mem" or "copy run start" is taking forever on Cisco routers or switches? Rest assure that you are not alone, there are many of us who feel your pain. It even takes longer to return these results on a system containing numerous lines in the running configuration. Why? Because the NVGEN process needs to query everything about your router and then output these results. It's painstakingly long especially when you are in the middle of troubleshooting something. 30 seconds may as well be 30 years. Not to mention that it almost results in a CPU spike sending false alerts everywhere and to everyone. To return the results of the aforementioned commands much faster enable the configuration performance enhancement by typing "parser config cache interface" in the global config mode.
Thursday, February 14, 2013
BGP - Maximum-path - hidden command
Two is better than one -- More is better or is it? Well I guess we can ruminate on semantics but I think we would rather see how we can implement equal cost multi-path (ECMP) routing using eBGP. By default BGP only installs THE BEST PATH after going through the BGP Bestpath selection algorithm (Cisco).

Thursday, August 9, 2012
Securing SSH - Tips & Tricks
Strong Usernames/Passwords
To most of us, this comes as a no-brainer. To others, not so much... Regardless, the strength of username/password combinations is extremely important. If the password being used is a dictionary word or could be derived from the username, there may as well be no password at all... Ideally, passphrases should be used. A passphrase is just like a password except for instead of using a word, a phrase would be used. Passwords and passphrases alike should also be mangled.
To most of us, this comes as a no-brainer. To others, not so much... Regardless, the strength of username/password combinations is extremely important. If the password being used is a dictionary word or could be derived from the username, there may as well be no password at all... Ideally, passphrases should be used. A passphrase is just like a password except for instead of using a word, a phrase would be used. Passwords and passphrases alike should also be mangled.
Friday, April 27, 2012
Configuring /31 - P2P or Segment with 2 endpoints
In general, most ISPs will assign a /30 on point-to-point interfaces which gives you 4 IP addresses and 2 of which are usable resulting in 50% of addresses in that subnet being wasted. For example 1.1.1.0/30 yields 1.1.1.1 and 1.1.1.2 as your usable IP addresses and 1.1.1.0 is the subnet number and 1.1.1.3 is the broadcast address. And as you can see only 2 out of the 4 IP addresses are usable. So how we can be more efficient? The use of a /31 subnet mask which gives you 2 IP addresses and 100% of them will be utilized.
 Consider a very simple topology below and let's get started.

Subscribe to:
Posts (Atom)