Please read my previous NAT posts if you need a refresher on NAT. At this point, I am assuming you are fairly familiar with NAT and its concepts, so I will get right down to business and spare you the usual 'abc' of NAT'ng.
Consider this simple topology and let's get started.

First let's get the easiest router configured (R5).


First let's get the easiest router configured (R5).

- Set the interface IP
- Description
- A static route to the default gateway (HSRP ADDRESS)
Next let's get the interfaces configured on R2 and R3.

- Set the IP of R2.
- Define fast1/0 as NAT inside.
- Configure the HSRP floating address.
- Set the timers so HSRP can converge faster. The default timer is 3 and 10 (keepalive and hold time).
- Set the priority to 120 so it can be the primary HSRP router. Default is 100.
- Configure preempt which is not on by default.Technically you don't need it but might as well configure it.
- Configure the HSRP group name.
- Configure track so when fast1/1 (nat outside) interface goes down priority can be decremented by 30 therefore allowing R3 take over the HSRP address.
- Set the IP of R3.
- Define fast1/0 as NAT inside.
- Configure the HSRP floating address.
- Once again adjust the timers so HSRP can converge faster.
- Configure preempt which is not on by default.
- Configure the HSRP group name.
- Configure track and priority. The priority will be decremented by 10 if fast1/1 goes down.
Time to get the outside interfaces configured.

- Set the IP address of the outside interface R2.
- Define R2 fast1/1 as the NAT outside interface.
- Set the IP address of the outside interface of R3.
- Define R3 fast1/1 as the NAT outside interface.
Do a show command just to verify HSRP is working as expected.

We are going to be configuring BGP later to advertise our NAT POOL to R4 so let's get a 'discard route' in our routing table.

Now let's move on to the NAT statements.

- Assign the Stateful ID. This has to be unique to the router and must be different on both routers.
- Create the redundancy and attach the HSRP group name. We defined RED earlier in the HSRP configuration.
- Assign the mapping-id which will be used in the NAT statement. This must match on both routers.
- Assign the protocol used for conversations between the routers. TCP is also available.
- Create the NAT pool.
- Configure the NAT statement. Note that the mapping-id is 100 which we defined earlier.
- Create the access-list to match the traffic that is to be NAT'd
- Assign the Stateful ID. Must be different than the other router.
- Create the redundancy and attach the HSRP group name. We defined RED earlier in the HSRP configuration.
- Assign the mapping-id which will be used in the NAT statement. This must match on both routers.
- Assign the protocol used for conversations between the routers. TCP is also available.
- Create the NAT pool.
- Configure the NAT statement. Note that the mapping-id is 100 which we defined earlier.
- Create the access-list to match the traffic that is to be NAT'd
Now let's get our R4 configured and it is fairly straight forward.

- Set the IP of this interface.
- Create a new instance of BGP.
- Set the timers so BGP can converge quickly.
- Create the R2 neighbor.
- Set the weight so R2 will be preferred to reach the NAT POOL.
- Create the R3 neighbor.
Let's get BGP configured our R2 and R3.

- Create a new instance of BGP.
- Advertise the NAT POOL with the network statement.
- Configure the neighbor statement with remote-as 2.
Show command to verify that Stateful NAT is configured and working as expected.

- Note that both of the routers show the state as being ready.
- We can also see that R2 is Active and R3 is Standby as expected.
- As of right now we do not have any NAT translations which you can verify by typing 'show ip nat translations'.

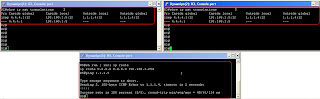
- Ping R4 (1.1.1.4)
- R2 has the translations.
- And R3 has the same translations.
As you can see both routers have the same NAT translations.
Troubleshooting
Troubleshooting
- debug ip nat detail
- debug ip snat detail
- debug standby
- show ip nat translations
- show ip snat distributed
- show ip nat statistics
- Email arwinatgmail.com :)
Conclusion
NAT Stateful Failover with HSRP is a great high availability solution. However, with any solution careful considerations must be given to designing it efficiently or else you maybe spending time polishing your resume.
If you like my blogtorials, please subscribe/comment/+1/spread the word :)
Thank you.
Learning
ReplyDelete